
Introduction
Is your garage door refusing to open or close fully? This common frustration could be due to broken or damaged garage door cables. Our comprehensive guide will walk you through the process of identifying, repairing, and preventing cable damage on your own. With Rogers Garage Door Repair, we got your back. Why? because we are the garage door experts in Orange CA.
Keep reading – a DIY garage repair may just save your day!
Key Takeaways
- Garage door cables play a crucial role in the smooth operation of your garage door, assisting in the lifting and lowering of the door.
- Signs of a broken cable include the garage door not opening or closing properly, unusual sounds from the door, an uneven appearance when opening or closing, visible damage on cables, rapid falling of the garage door when lowered, and tangles in the cable.
- Repairing a garage door cable requires proper safety precautions and specialized knowledge. Calling a professional for assistance is highly recommended to ensure safety and efficiency.
- Regular inspection and maintenance are key to extending your garage door’s lifespan and ensuring its proper operation.
- DIY repairs can save you money but should only be attempted if you have the necessary tools, knowledge, and confidence. Otherwise, it’s best to call a professional for help.
Understanding Garage Door Cables
Garage door cables play a crucial role in the smooth operation of your garage door, assisting in the lifting and lowering of the door.
What Do Garage Door Cables Do?
Garage door cables serve a vital role in the efficient operation of your garage door system. They connect to the spring mechanism, providing the force necessary to lift and lower heavy garage doors.
There are two common types of these systems: torsion spring-controlled and extension spring-controlled cables. Torsion springs mount horizontally above the garage door opening, winding around a drum as you open your door.
On the other hand, an extension spring’s cables attach to each horizontal track and stretch with the weight of lowering doors. Additionally, there are safety cables; these help keep extension springs suspended if a break occurs in either cable or spring mechanisms—a precaution designed to prevent damage or injury from uncontrolled movement.
Different Cables For Different Garage Spring Systems
Garage doors operate primarily on two spring systems: the torsion spring system and the extension spring system. Each system has its own specific type of cable to suit its functioning mechanism.
The torsion spring system, mostly used in heavier garage doors, uses lift cables that attach to the bottom corners of your door and wind around grooved drums as it opens or closes.
These cables are wound under tension from a central point above the garage door, rotating when your door is manipulated. This rotation helps balance out heavy loads and promotes smoother operation.
In contrast, lighter garage doors often use an extension spring system where two springs run parallel to each individual garage door track. A pulley is associated with these springs along with an “S” hook attached to a pulley cable – acting as this setup’s lifeline.
The key role of these cables is pulling up your garage while it opens by extending the springs, leveraging its tension power into kinetic energy for smooth motion.
Whichever type belongs to your home improvement project, always understand that these cables are integral components lodged under considerable tension and their repair or replacement needs utmost diligence with attention towards safety measures including wearing protective equipment such as safety glasses and gloves.
Identifying Cable Damage
To repair a garage door cable, it’s important to first identify any signs of damage.
Signs of a Broken Cable
Garage door cables play a vital role in the smooth operation of your garage door system. A well-functioning cable ensures that your door opens and closes with ease, but like any part of your home’s infrastructure, it can encounter problems over time. Here are some signs of a broken garage door cable:
- The garage door won’t open or close properly: If your garage isn’t opening or closing as it should be, a broken cable could be to blame.
- Unusual sounds from the door: Noises such as grinding, squeaking or banging may indicate a problem with the tension spring or cable.
- The garage door appears uneven when opening or closing: This can suggest that one side’s cable is damaged while the other side is still functioning properly.
- Visible damage on cables: Look for fraying, rusting or loose wires.
- The garage door falls rapidly when lowered: A functioning cable ensures safe and slow movement of the door; if it drops unexpectedly, this could be due to a faulty cable.
- Tangles in the Cable: Twisted cables can prevent correct alignment and cause issues in functioning.
When to Call a Professional
Calling a professional for garage door cable repair is highly recommended for several reasons. Firstly, repairing garage door cables requires specialized knowledge and tools that professionals possess.
They have the expertise to identify and address any underlying issues that may be causing the cable damage. Secondly, attempting DIY repairs without proper training can lead to personal injury or further damage to the garage door system.
Professional technicians prioritize safety and take necessary precautions during repairs. Lastly, calling a professional ensures that the job is done correctly and efficiently, saving you time and potential frustration down the line.
Steps to Repair Garage Door Cable
To repair a garage door cable, start by gathering the necessary safety equipment such as eye protection and gloves. Then, position a ladder to the side of the spring ends and disconnect the garage door opener for added safety.
Next, loosen and unwind the tension springs before disconnecting them from the center bracket. Finally, carefully examine and replace any damaged pulley lifting cables to ensure smooth operation of your garage door.
Safety Preparations
Ensure your safety during the garage door cable repair by following these important safety preparations:
- Wear protective eyewear and gloves to protect your eyes and hands from any potential injuries.
- Position a ladder securely to the side of the garage door spring ends, making sure it is stable and won’t shift during the repair process.
- Disconnect the garage door opener to prevent any accidental activation while you’re working on the cables.
- Release tension in the garage door springs by following proper winding bar techniques before starting any repairs.
- Make sure you have all the necessary tools readily available, including sockets, wrenches, vice grips, replacement cables, winding bars, and safety gloves.
- Familiarize yourself with the specific steps for repairing your type of garage door cable system to ensure you’re following the correct procedures.
- Take accurate measurements of the existing cables and springs to ensure proper replacement parts are purchased.
- Follow manufacturer or professional recommendations for lubrication using silicon or graphite spray on moving parts to reduce friction and prolong their lifespan.
- Keep a first aid kit nearby in case of minor injuries, such as cuts or scrapes.
- If you’re unsure about any aspect of the repair process or lack confidence in your DIY skills, it’s best to contact a professional garage door service company like ProLift Garage Doors for assistance.
Examining and Repairing Metal Tracks
Metal tracks are an essential part of any garage door system. They guide the door’s movement and ensure smooth operation. Here are the steps to examine and repair metal tracks:
- Begin by inspecting the metal tracks for any visible damage or signs of wear. Look for crimps, folds, dents, or other issues that can hinder the door’s movement.
- If you notice minor dents in the metal tracks, you can often repair them yourself. Use a rubber mallet or a hammer and a block of wood to carefully tap out the dent. Be gentle to avoid causing further damage.
- For more severe dents that cannot be easily repaired, consider using a garage door track anvil. This specialized tool allows you to reshape and straighten bent sections of the metal tracks for proper functionality.
- Along with examining the metal tracks, it’s important to inspect the mounting brackets that hold them in place. Loose or damaged mounting brackets can affect the stability of the tracks and compromise the overall operation of the door.
- If you find loose or dented mounting brackets, tighten them using appropriate tools such as wrenches or screwdrivers. In some cases, you may need to replace damaged brackets to ensure proper alignment and functionality.
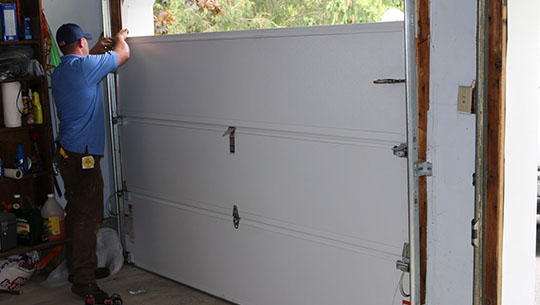
Removing and Replacing the Extension Spring
To repair a garage door cable, you may need to remove and replace the extension spring. Follow these steps to successfully complete this task:
- Start by gathering all the necessary tools and equipment. This includes an adjustable wrench, locking pliers, winding bars, rags, safety glasses, and gloves.
- Before starting any work on the garage door cables, it is crucial to disable the power source by disconnecting the garage door opener from the electrical outlet.
- Position a ladder on the side of the extension springs and make sure it is secure before climbing up.
- Use an adjustable wrench to loosen and remove the setscrews that secure the extension spring pulley cables in place.
- Carefully unwind or release tension from the old extension spring. This can be done by using winding bars inserted into designated holes on each side of the spring cone while keeping a firm grip on them.
- Once the tension is released, remove any clamps or attachments that hold the extension spring in place on both sides of the door track or frame.
- Gently slide out the old extension spring from its mounting brackets or clips.
- Measure your old extension spring carefully for length and diameter so you can find an appropriate replacement at a local hardware store or online supplier.
- With your new extension spring in hand, insert it back into its mounting brackets or clips following manufacturer’s instructions or professional recommendations.
- Reattach any clamps or attachments to secure the new extension spring in place firmly.
- To restore tension to your new extension spring, use winding bars again by inserting them into designated holes on each side of the spring cone while turning them in opposite directions until they reach their desired tension level recommended by professionals.
- Garage door tension springs, including extension springs, provide lifting force for heavy doors and are under tremendous tension.
- Repairing garage door tension springs requires the use of correct tools and instructions to ensure safety.
- DIY garage door spring replacement may save you around $200 or more, depending on your location.
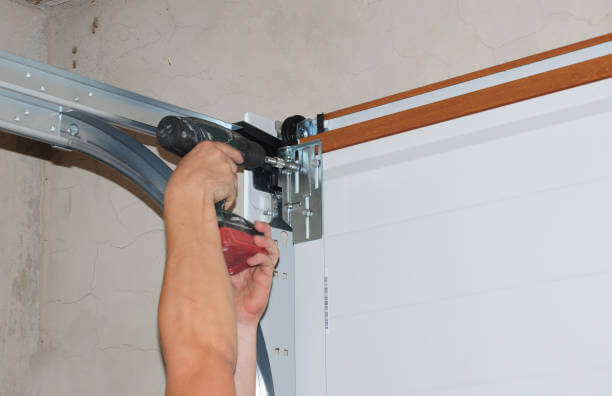
Examining and Replacing the Pulley Lifting Cable
Examining and replacing the pulley lifting cable is an important step in repairing your garage door. Here are the steps to follow:
- Start by disconnecting the garage door opener to ensure safety.
- Inspect the pulleys for any signs of wear or damage, such as frayed cables or loose connections.
- Measure the length of the lifting cable to ensure you get the correct replacement part.
- Loosen any setscrews on the pulleys using a socket/ratchet set or a wrench set.
- Remove the old lifting cable from the pulleys and discard it.
- Install the new lifting cable onto the pulleys, making sure it is securely attached.
- Use locking pliers to hold one end of the cable while threading it through any necessary brackets or guides.
- Thread the other end of the cable through additional brackets and guides, ensuring it is properly aligned with the pulleys.
- Tighten any setscrews on the pulleys to secure them in place and prevent slippage.
- Check that all connections are tight and secure before reattaching the garage door opener.
- The garage door lift system consists of torsion springs, drums, and cables.
- DIY garage door spring replacement may save you around $200 or more, depending on your location.
- Repairing garage door tension springs requires correct tools and instructions for safety purposes.
Preventative Measures for Cable Damage
To prevent cable damage on your garage door, there are several preventative measures you can take. First and foremost, it’s important to regularly inspect the cables for any signs of wear or fraying.
This can be done by visually examining the cables and feeling for any rough spots or areas with reduced flexibility. Additionally, make sure to lubricate the cables annually with a silicon or graphite-based lubricant to reduce friction and prolong their lifespan.
Another crucial step is maintaining proper garage door balance. A properly balanced door puts less strain on the cables, reducing the likelihood of damage. To check the balance, disconnect your opener and manually open the door halfway.
If it stays in place without dropping or rising, it’s balanced correctly. If not, you may need to adjust the tension springs accordingly.
Furthermore, always exercise caution when operating your garage door. Avoid slamming it shut or opening it forcefully as this can cause unnecessary stress on both the springs and cables.
Additionally, do not attempt to repair or replace damaged cables yourself unless you have experience in handling these components.
By implementing these preventative measures and practicing regular maintenance on your garage door system, you can significantly reduce the risk of cable damage and extend its overall lifespan.
Remember that safety should always come first when dealing with any aspect of your garage door system.
Conclusion
In conclusion, repairing a garage door cable is something that can be done with the right tools and instructions. By following proper safety precautions and understanding the components of your garage door system, you can save money by tackling this DIY project yourself.
However, if you’re unsure or uncomfortable with the process, it’s always best to call in a professional for assistance. Remember, safety should always be a top priority when working on any home improvement project.
FAQs
1. Is it possible to repair a garage door cable on my own?
While it is technically possible to repair a garage door cable yourself, it is highly recommended that you hire a professional technician for this task. Repairing garage door cables can be dangerous and requires specialized knowledge and equipment.
2. How do I know if my garage door cable needs repair?
There are several signs that indicate your garage door cable may need repair, such as the door becoming unbalanced or crooked, unusual noises when operating the door, or frayed or broken cables visible upon inspection.
3. What causes garage door cables to break or become damaged?
Garage door cables can break or become damaged due to various reasons including wear and tear over time, improper installation, rust or corrosion, loose hardware, excessive tension on the cables, or impact from an object.
4. How much does it cost to repair a garage door cable?
The cost of repairing a garage door cable can vary depending on factors such as the type of cable used in your system, the complexity of the repair needed, and the region where you live. It is best to contact local professionals for accurate pricing information based on your specific situation.